Connect your agent to vifo
Any MCP-capable agent — Claude, ChatGPT, Gemini, Cursor and more · about two minutes · Last updated: 27 August 2026
https://vifo.app/mcp
When the agent connects, a vifo page opens — sign in with a one-time email code. Any email works; first sign-in creates the account.
Standard OAuth, automatic registration. Leave any client ID / client secret fields empty.
The tag on each card shows what that agent needs — Grok and WorkBuddy take custom connectors on the free tier.
Not ready to set up an agent? Sign up with your email and upload photos straight from the browser — connect the agent whenever you like.
Claude (web, desktop and mobile)
Official setup guide: support.claude.com ↗
Connectors added on claude.ai follow your account, so one setup covers the Claude desktop and mobile apps too.
Open the Connectors settings
Click your initials at the bottom-left → Settings → Connectors (direct link: claude.ai/settings/connectors). Click Add in the top-right corner and choose Add custom connector.
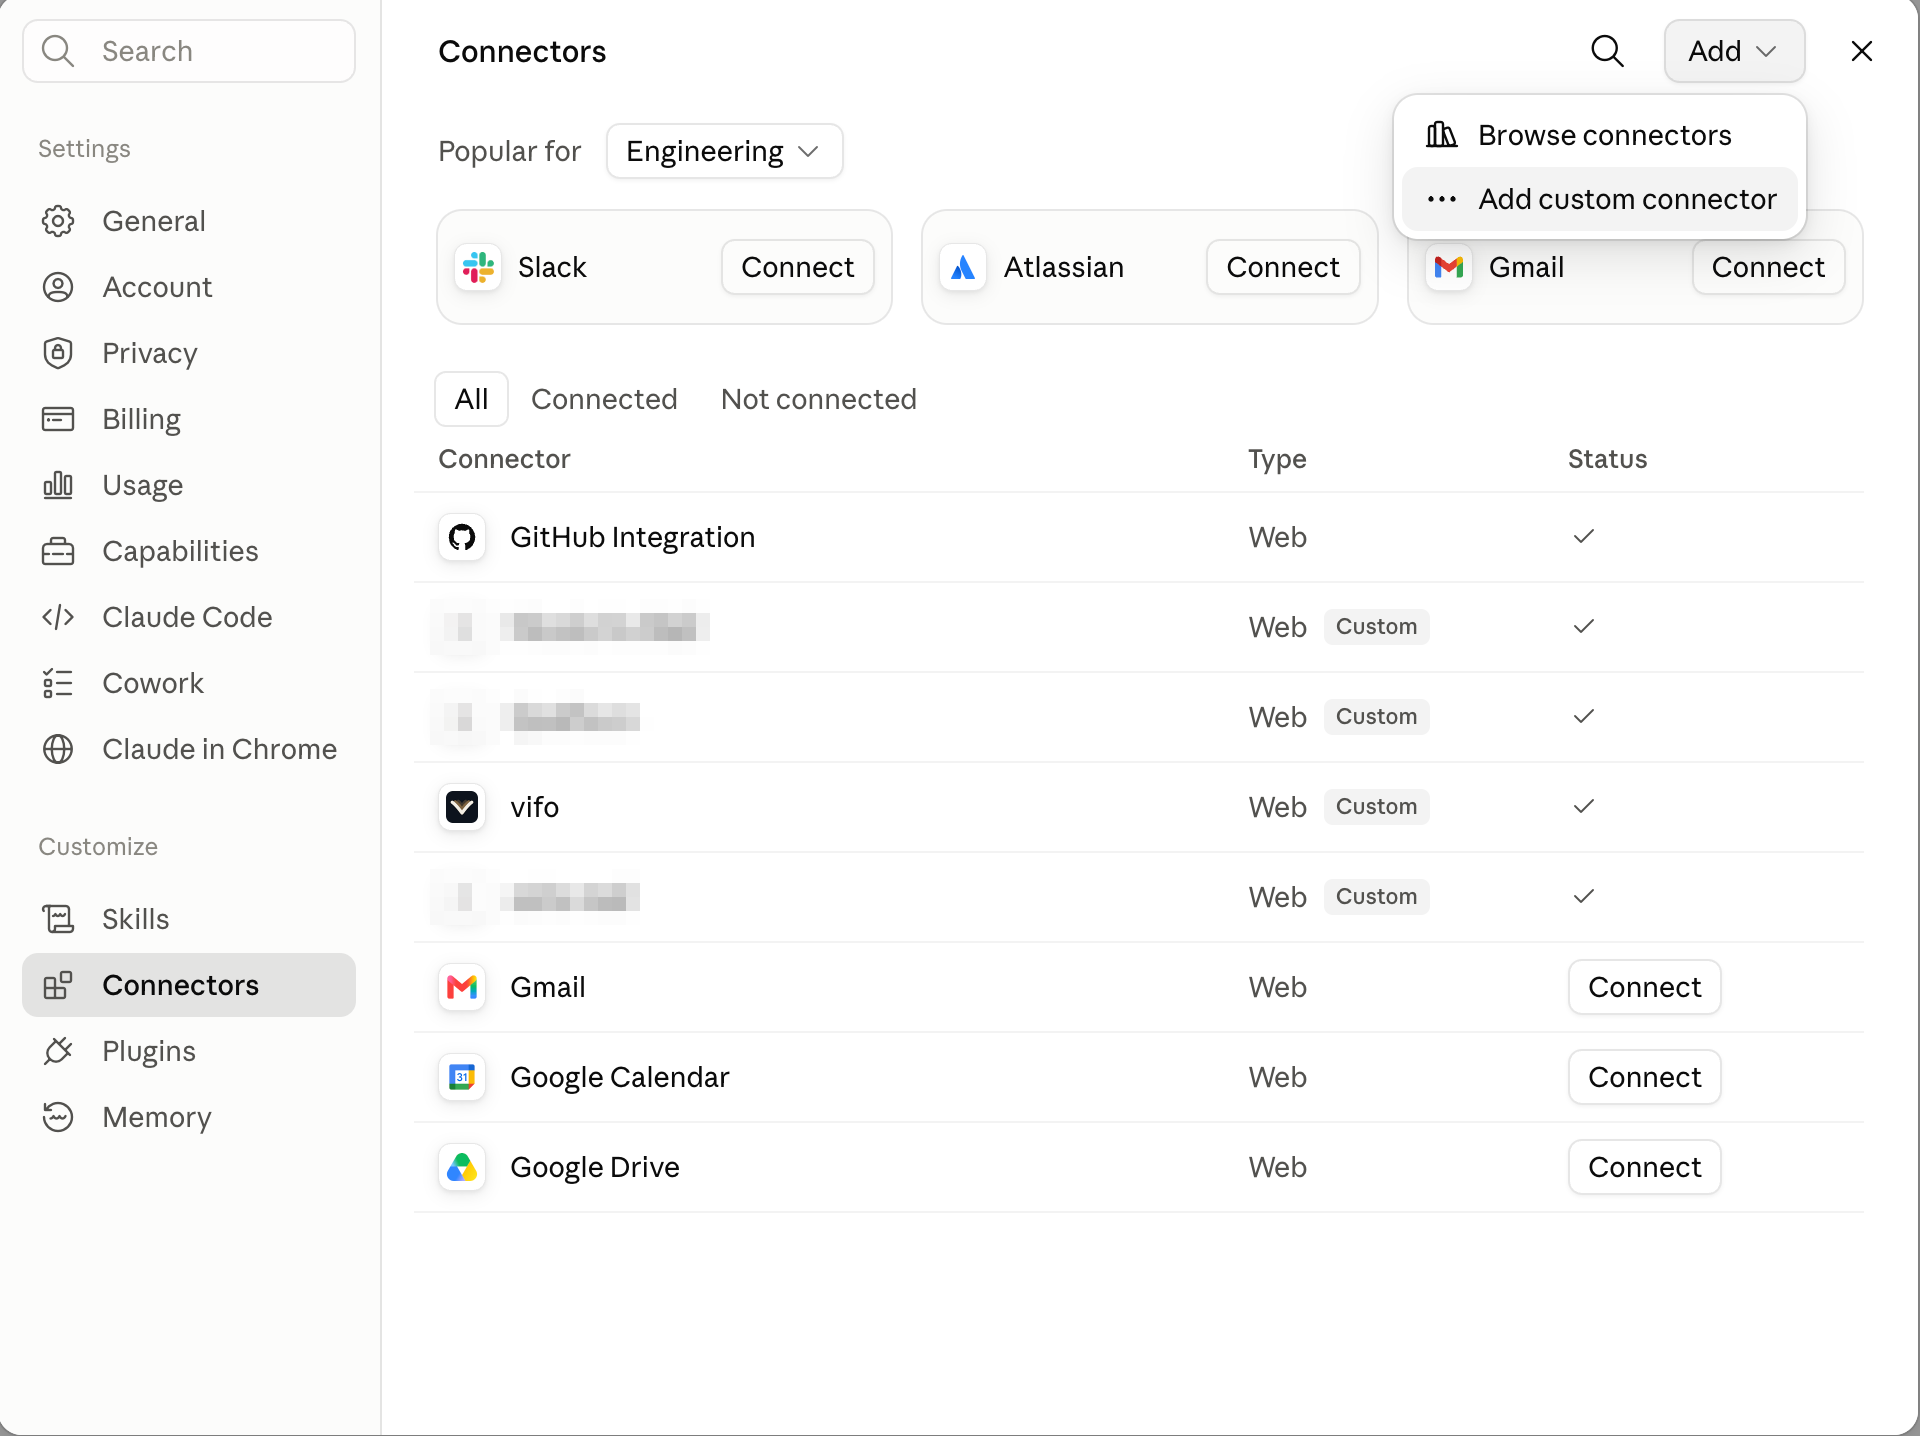
Fill in the two fields
Name: vifo (any name you like — it is what the tool menu shows). Remote MCP server URL: https://vifo.app/mcp. Leave Advanced settings alone and click Add.
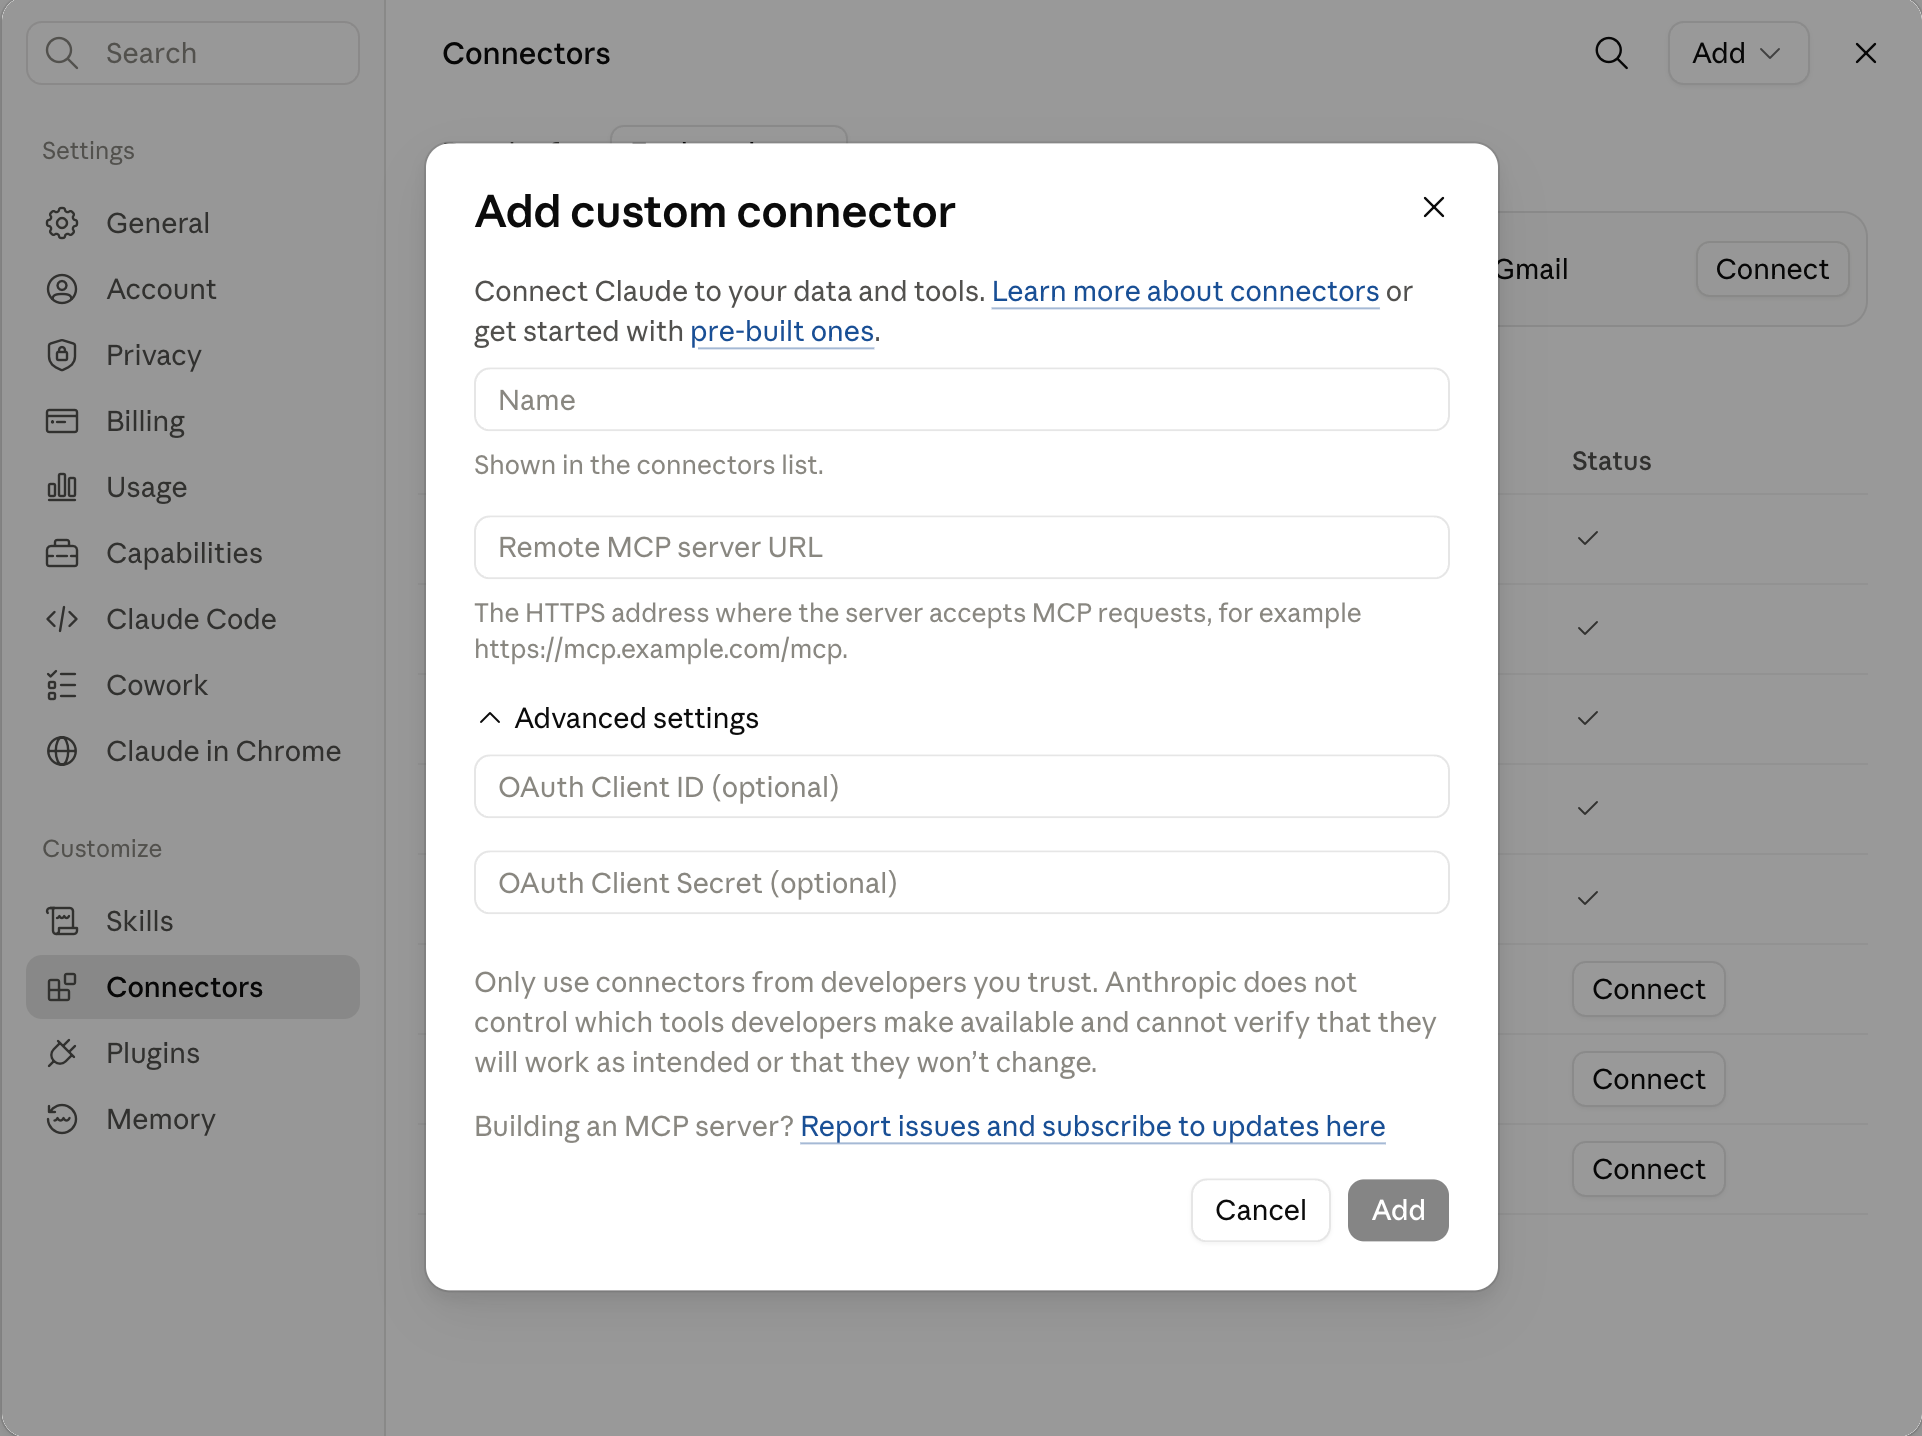
Connect and sign in to vifo
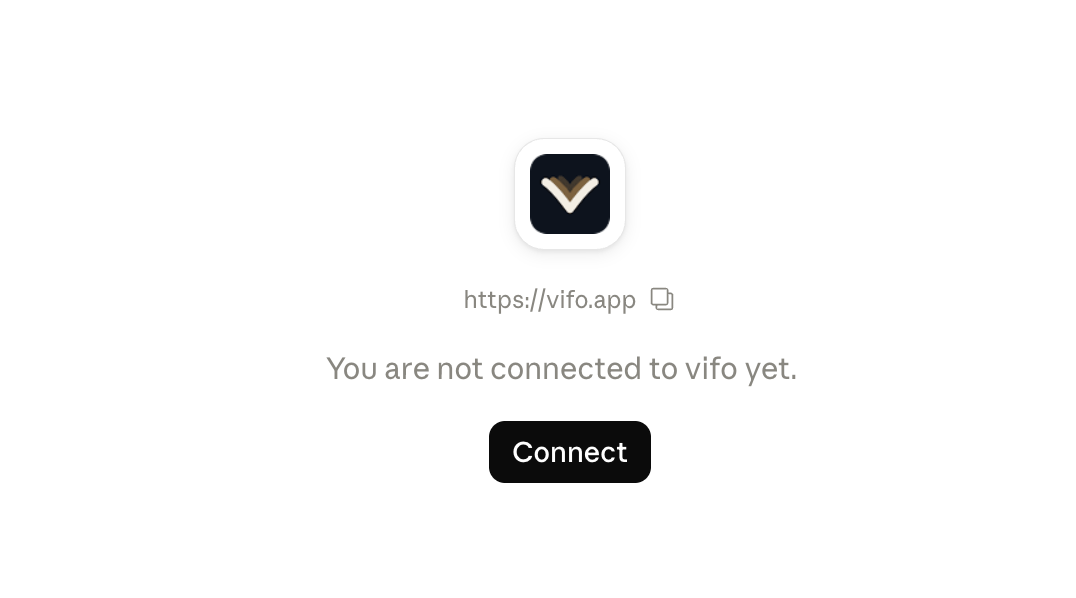
Claude now shows a page saying You are not connected to vifo yet — click Connect (if you closed it, find vifo in the connectors list instead). A vifo page opens: enter your email, type the code we send you, then press Allow the connection. Back in Claude, vifo is listed with a check mark under Status.
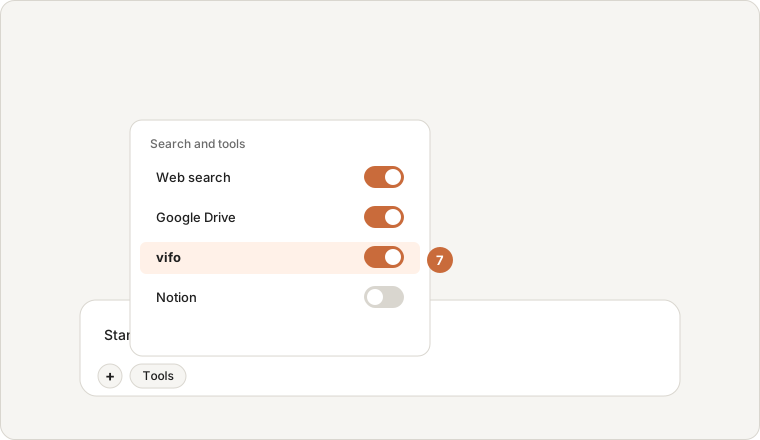
Use it in a chat
In a new chat, open the + / Tools menu under the message box and make sure vifo is switched on. Then just talk: “Start a new trip — Kyoto, five days.” For photos, say “give me an upload link” — you open it on your phone and pick them there (pasting pictures into the chat does not get them to vifo). Claude will ask before it writes anything the first time.
Claude Code
Official setup guide: docs.claude.com ↗
One command in the terminal, then authenticate once:
claude mcp add --transport http vifo https://vifo.app/mcp
claude          # inside the session, run /mcp and pick vifo → Authenticate
The browser opens the same vifo sign-in page; after Allow the connection the tools are available in every project.
ChatGPT
Official setup guide: help.openai.com ↗
ChatGPT now calls custom MCP servers plugins (they used to be connectors) and hides the option until Developer mode is on. Available on Plus, Pro, Business, Enterprise and Edu plans; on Business / Enterprise a workspace admin may have to enable it.
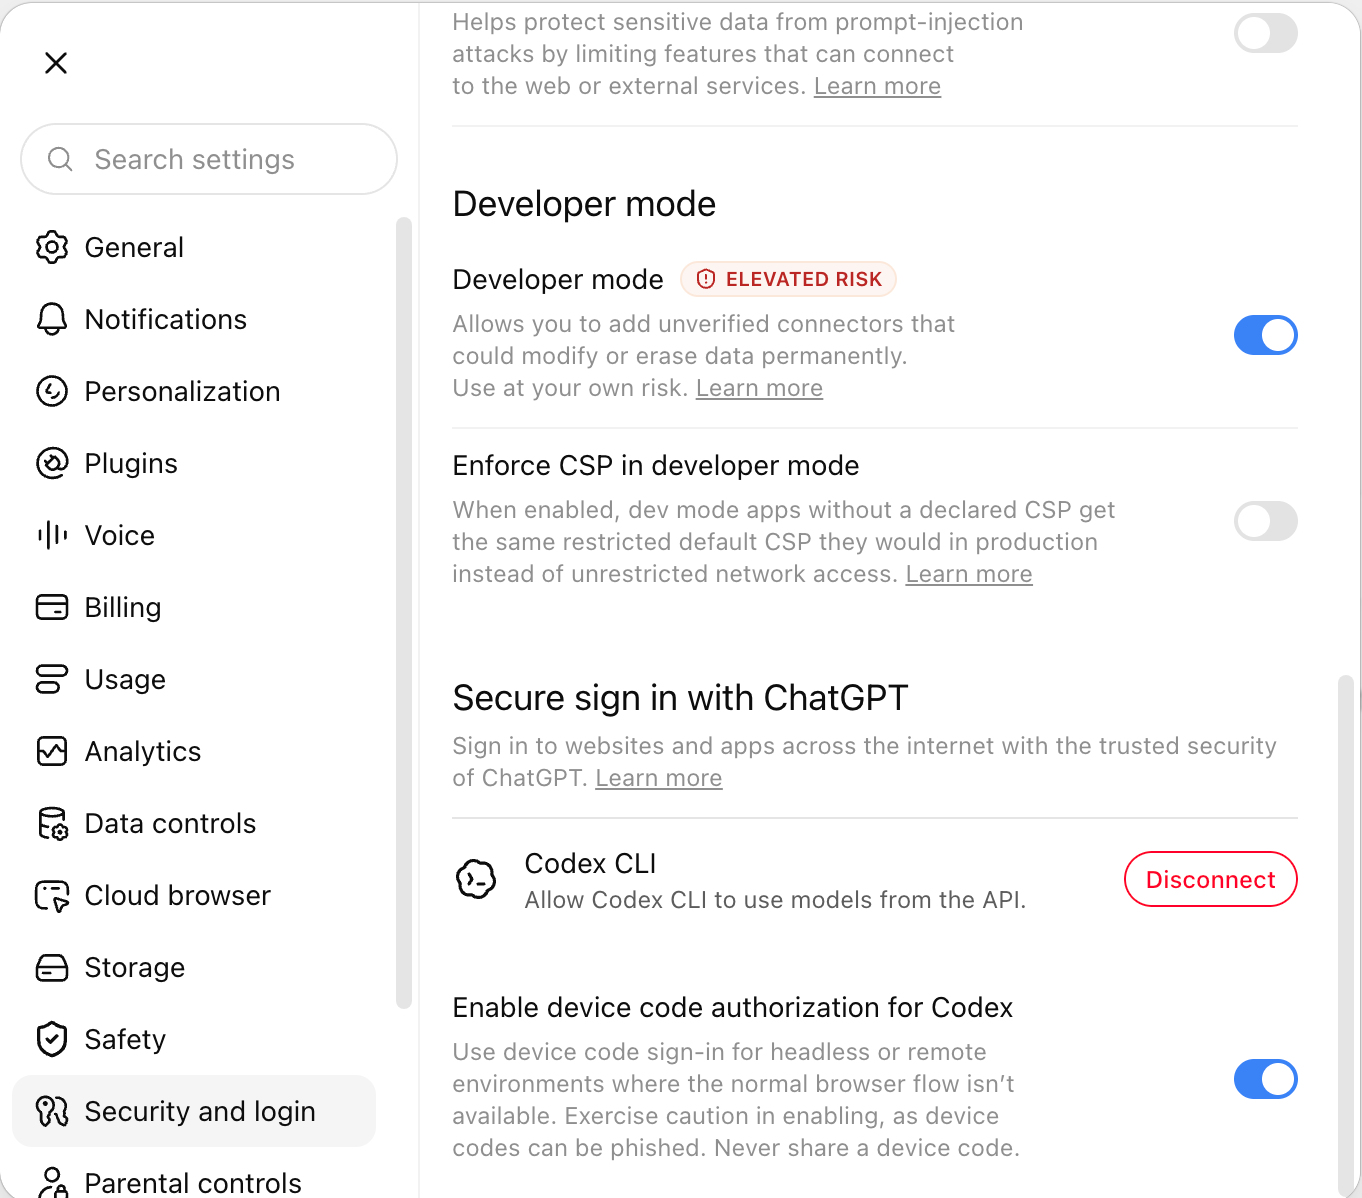
Turn on Developer mode
Profile menu → Settings → Security and login → scroll to Developer mode and switch it on. It is labelled elevated risk — that warning applies to any unverified server, and is why ChatGPT asks you to confirm each write.
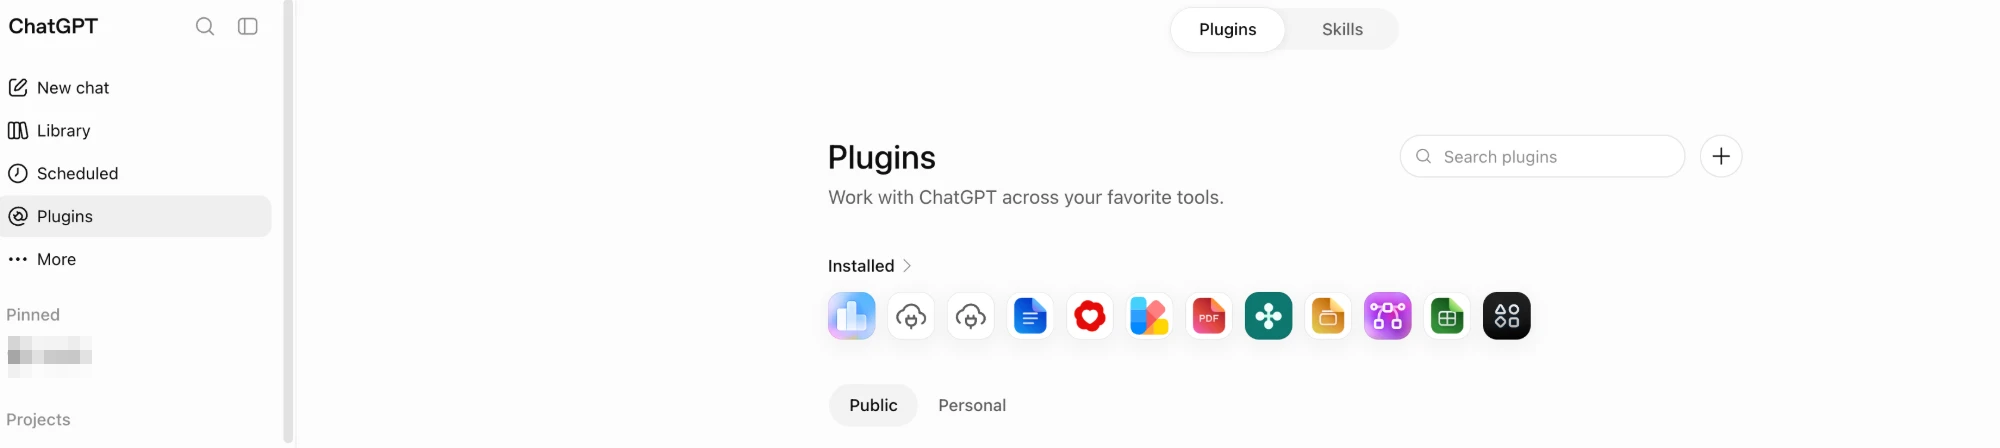
Open Plugins
In the sidebar click Plugins, then the + button next to the search box.
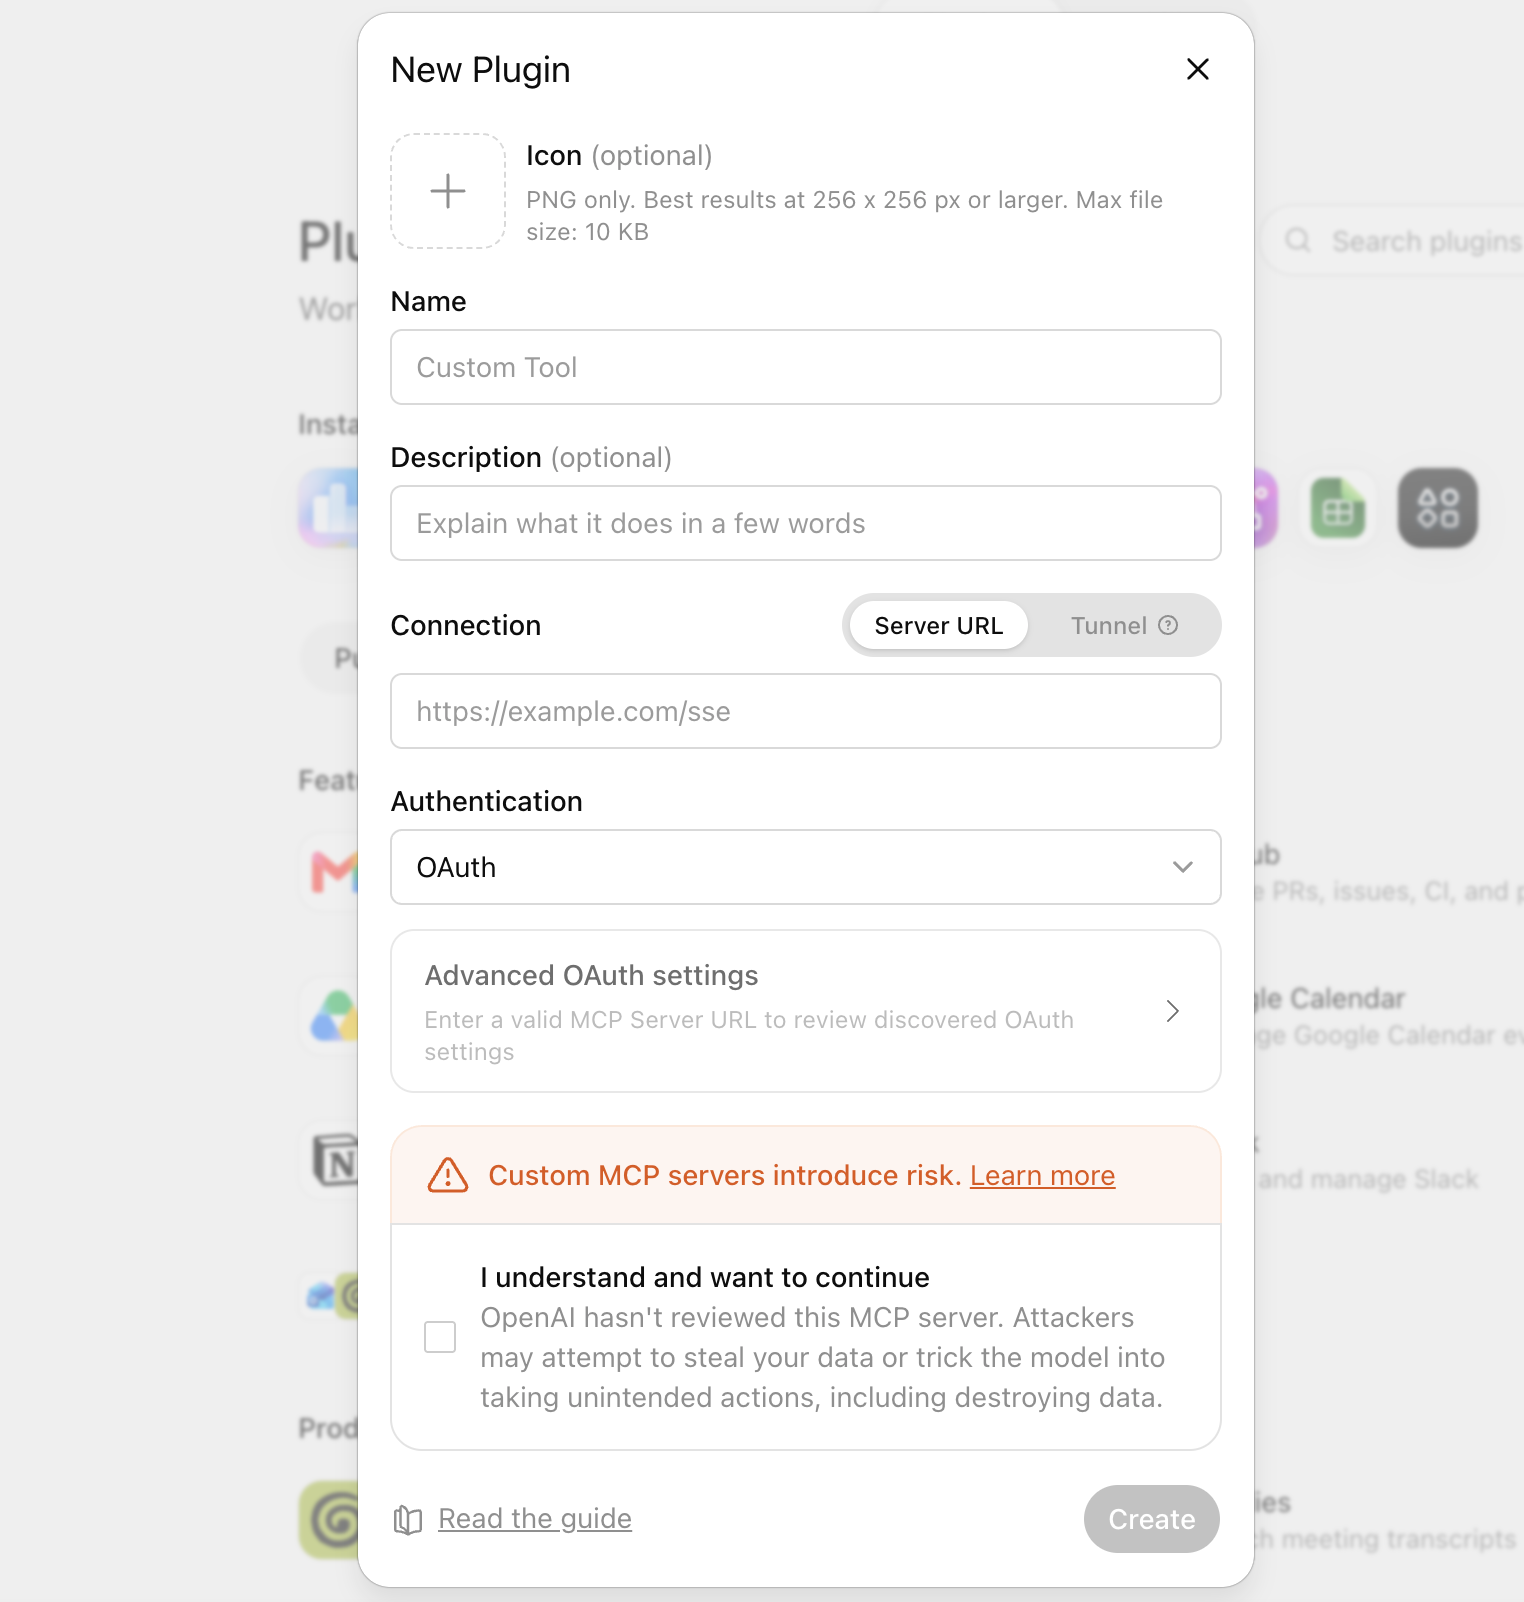
Fill in the New Plugin dialog
Name: vifo (icon and description are optional — skip them). Connection stays on Server URL: https://vifo.app/mcp. Authentication → OAuth, and leave Advanced OAuth settings alone — vifo registers itself. Tick I understand and want to continue, then click Create.
Sign in to vifo
ChatGPT immediately opens the vifo sign-in page (or shows a Connect button — click it). Enter your email and the code, press Allow the connection, and you are returned to ChatGPT with vifo listed under your installed plugins.
Use it in a chat
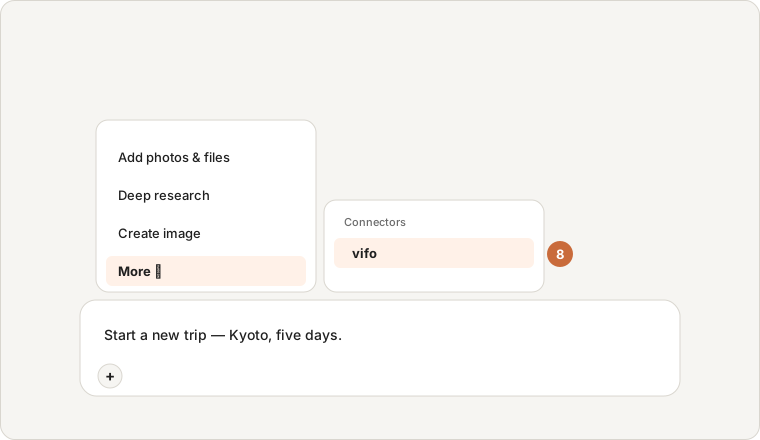
In the message box click + → More → vifo to attach it to the conversation (in Developer mode ChatGPT will not pick it up on its own). Then describe the trip and ask for an upload link — you open it on your phone and pick the photos there. ChatGPT asks for confirmation before write actions.
Photos in ChatGPT: vifo receives the bytes the agent uploads through its tools, not the files you drop into the chat. If ChatGPT says it cannot upload a file, use Claude, Claude Code or a local agent for the photo step — ChatGPT still works for notes and organising.
Gemini (web and mobile, via Spark)
Official setup guide: support.google.com ↗
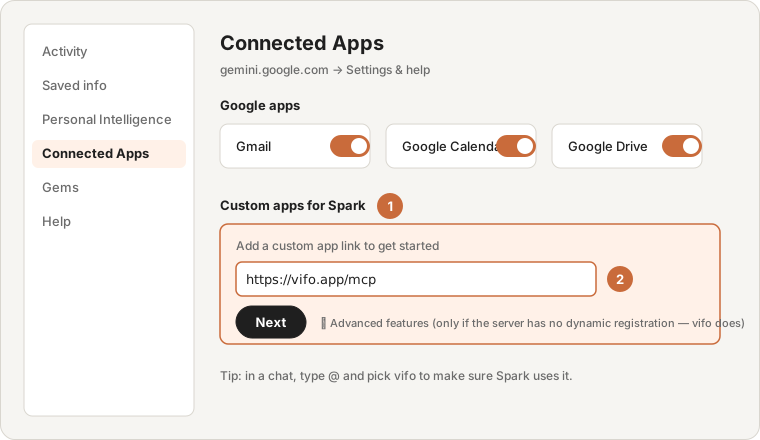
The Gemini app takes custom MCP servers through Gemini Spark. You need a Google AI Pro or Ultra subscription, a personal Google Account (work/school accounts are excluded for now), be 18+, and have Keep Activity switched on. You add the server on the web only; once added it works in the Gemini mobile app too.
- Open
gemini.google.com→ bottom-left Settings & help → Connected Apps (if you do not see it, go through Personal Intelligence first). - Under Custom apps for Spark, paste
https://vifo.app/mcpinto Add a custom app link (or click Add a custom app) and press Next. Leave Advanced features closed — vifo registers itself. - Follow the prompts: the vifo sign-in page opens; enter the email code and press Allow the connection.
- In a Spark chat type
@and pick vifo so Gemini uses it for that prompt. To revoke later: Connected Apps → the app → Unlink, or your Google Account’s Linked apps page.
Grok (web, iOS and Android)
Official setup guide: docs.x.ai ↗
Grok calls this Bring Your Own MCP; it is on the free plan. Add it on the web (grok.com) — the iOS and Android apps then pick it up, but connecting from inside the app does not work yet: its Connectors screen is an embedded web page that cannot open the sign-in popup (“Your browser blocked the sign-in popup”), and this affects catalog connectors too (verified 23 August 2026). On Business / Enterprise an admin must allow it in the console first.
- In a desktop browser open
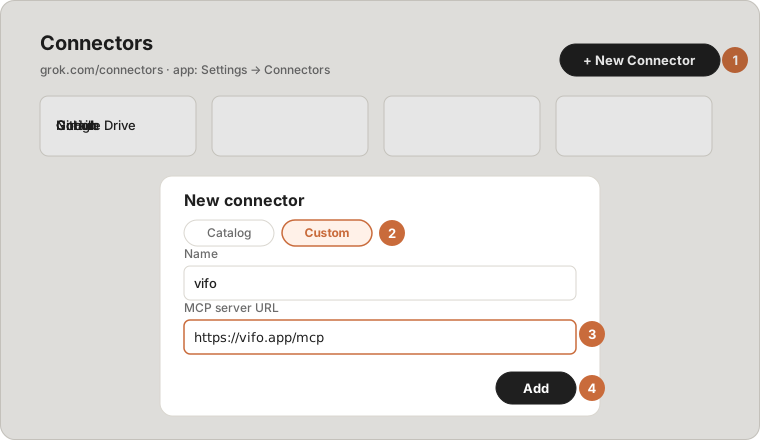
grok.com/connectors(the phone app’s Settings → Connectors shows the list, but its embedded page cannot open the sign-in popup). - Click New Connector → Custom, name it
vifo, pastehttps://vifo.app/mcp, Add. - Grok sends you to the vifo sign-in page; email code or Google, Allow the connection. Back in Grok the connector shows as connected — on the web and, after a restart, in the phone app too.
Perplexity (web, desktop and mobile)
Official setup guide: perplexity.ai/help-center ↗
Custom connectors are on Pro, Max and Enterprise. One connector serves every model Perplexity routes to.
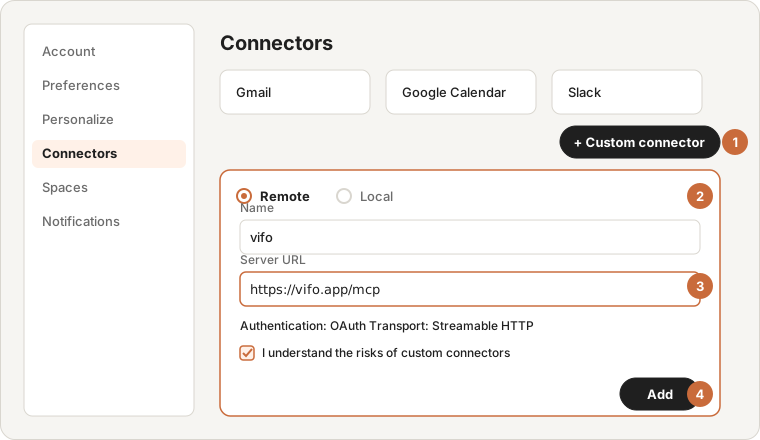
- Settings → Connectors → + Custom connector → choose Remote.
- Name
vifo, Server URLhttps://vifo.app/mcp, authentication OAuth, transport Streamable HTTP; acknowledge the risk note and Add. - Click the new card to authorize — vifo sign-in, email code, Allow the connection. In a thread, enable the connector from the sources / tools menu.
Tencent WorkBuddy (Windows and macOS)
Official setup guide: workbuddy.ai/docs ↗
WorkBuddy’s connectors are MCP underneath. Remote servers with standard MCP OAuth are supported, with automatic token refresh. (The phone app is a remote control for the desktop session, so the server is configured on the computer.)
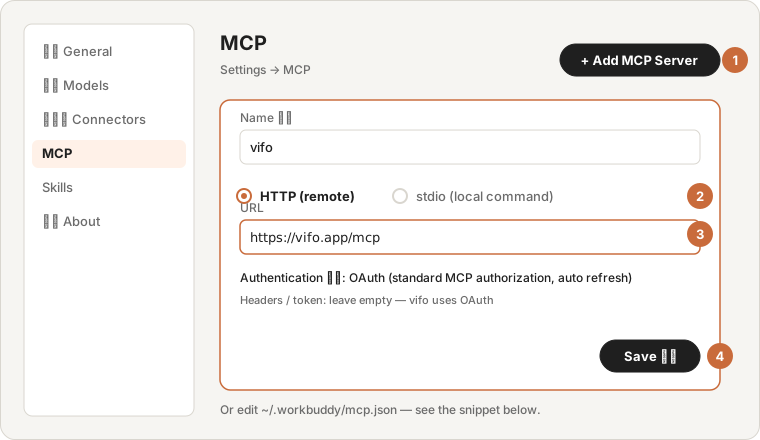
- Settings → MCP → Add MCP Server.
- Type HTTP (remote), name
vifo, URLhttps://vifo.app/mcp; leave headers and tokens empty and save. - WorkBuddy opens the vifo authorization in your browser — email code, Allow the connection. The tools appear in the chat; ask “what tools do you have?” to check.
If your build has no dialog for it, add this to ~/.workbuddy/mcp.json and restart:
{
  "mcpServers": {
    "vifo": { "type": "http", "url": "https://vifo.app/mcp" }
  }
}
Other agents
Official setup guide: modelcontextprotocol.io/clients ↗
- Mistral Le Chat / Vibe: Work → Connectors → + Add Connector → Custom MCP Connector → paste the URL; auth is auto-detected as OAuth 2.1. Administrator-only (on personal plans that is you).
- Codex:
codex mcp add vifo --url https://vifo.app/mcpthencodex mcp login vifo. - Cursor / Windsurf / Kimi Code / Qwen Code / any MCP client with OAuth: add a remote (HTTP) MCP server at
https://vifo.app/mcpand complete the browser sign-in when prompted. - Not yet possible: the consumer Microsoft Copilot, Doubao, Kimi and Qwen chat apps do not accept custom MCP servers today.
- Headless agents that cannot open a browser (OpenClaw, scripts, servers): create a key on the Connect page and send it as
Authorization: Bearer vf_…. Keys have fixed scopes; revoke and re-issue to change them.
Troubleshooting
The code never arrives
Check spam, and wait a minute before asking for another: a single address gets a limited number of codes per hour. Still nothing? Write to hello@vifo.app.
No “Add custom connector” / “Create” button
In Claude this needs a paid plan (and, on Team/Enterprise, an admin who allows custom connectors); in ChatGPT it needs Developer mode on; in Gemini it needs Google AI Pro/Ultra on a personal account, added from the web.
Connector shows “disconnected” later
The authorization was revoked or expired. Click Connect / Reconnect and sign in again; nothing in your notebook is affected.
How to revoke access
Remove the connector in the agent, and/or open the Connect page on vifo, where every connected app and key is listed with a revoke button.
What the agent can see
Only your own trips, photos and notes, within the scopes shown on the authorization page. Details in the Privacy Policy.